
### Keyword Analysis:
- Keyword: "how to play wish you were here by pink floyd"
- Occasion: This isn't a traditional greeting card occasion. The "occasion" is a personal quest for artistic and technical mastery. It's a moment of learning, dedication, and connection with a beloved piece of music. It signifies a rite of passage for many guitarists.
- Tone: The tone needs to be encouraging, methodical, and inspiring. It should respect the deep emotional weight of the song (nostalgic, melancholic, heartfelt) while providing clear, practical instructions. It's a blend of a patient teacher and a passionate fan.
- Recipient: The recipient is an aspiring guitarist. They could be a beginner ready for their first "real" song, an intermediate player wanting to perfect a classic, or simply a Pink Floyd fan who wants to connect with the music on a deeper level. They are looking for guidance, clarity, and motivation.
### Invented Categories:
Based on the analysis, the learning process can be broken down into distinct, manageable stages. These categories will guide the player from the first iconic notes to a full, emotive performance.
1. Decoding the "Radio Intro": Mastering the Opening Riff
2. Building the Foundation: The Heartfelt Strumming & Chords
3. Voicing the Melody: Learning Gilmour's First Lyrical Solo
4. The Emotional Peak: Conquering the Main Acoustic Solo
5. Bringing It Home: Structure, Vocals, and Performance Tips
"Wish You Were Here" is more than just a song; it's a feeling captured in music. For guitarists, learning to play it is a rite of passage, a way to connect with one of music's most poignant and beautiful compositions. Its shimmering acoustic layers and soulful melodies have made it a timeless campfire anthem and a true test of a player's ability to convey emotion through their instrument.
This guide is designed to break down the song into manageable pieces, from that unmistakable intro to the final, fading strums. Whether you're playing on a vintage 12-string or your trusty six-string, we'll walk you through the chords, the solos, and the feeling that makes this song a masterpiece. Let's begin the journey.
1. Decoding the "Radio Intro": Mastering the Opening Riff

This is the part everyone recognizes instantly. The original recording sounds like it's coming from a distant, tinny AM radio before blooming into full stereo. Here’s how to capture that magic on one guitar.
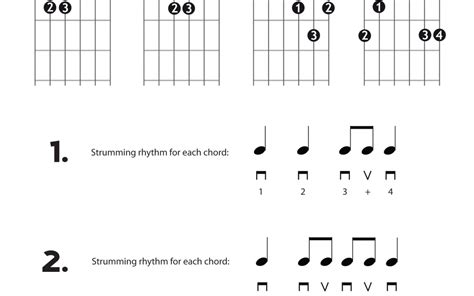
- Start with the right shapes. The intro uses simple open chord shapes but adds melodic flair: G (for one beat), then a walk-down using C/G and G, followed by an Am7/G and G. The key is the movement, not just the chords.
- Focus on the hammer-ons. The distinctive sound comes from hammering-on to the main chords. For the C/G shape, you'll be hammering on with your index and middle fingers. Practice this slowly until it's fluid.
- Listen for the rhythm. The intro has a loose, almost conversational timing. Listen to the original recording dozens of time to internalize the push and pull of the phrasing.
- Use a thin pick. To emulate that "tinny" radio sound, try using a thinner pick and playing closer to the bridge of your guitar. This will give you a brighter, more trebly tone.
- Break it into two-second loops. Don't try to learn the whole 45-second intro at once. Master the first phrase (the G-C-G part), then the second (the Am-G part), and then stitch them together.
- No 12-string? No problem. While a 12-string gives it that classic shimmer, you can get a great sound on a 6-string. Just focus on playing cleanly and letting the notes ring out.
- The Little Solo: The intro is followed by a simple, bluesy solo. This is your first taste of Gilmour's melodic genius. Learn it note-for-note by listening and using a good tab. It's all about the string bends and the soulful phrasing.
2. Building the Foundation: The Heartfelt Strumming & Chords
Once the intro is complete, the song settles into its main acoustic rhythm. This is the backbone of the verses and the part you'll sing over. The progression is simple, but the feel is everything.
- Know your core chords: The verse progression is primarily C, G, Am, G, D, C, G. The key is the smooth transition between them.
- Master the strumming pattern. The most common pattern used is a classic: D-DU-UDU (Down, Down-Up, Up-Down-Up). Practice this on a single muted chord until it becomes second nature.
- Use the D/F# chord for smooth transitions. When moving from the D chord to the C in the verse ("so you think you can tell..."), Gilmour often uses a D/F# (2x0232) as a passing chord. It creates a beautiful bassline walk-down.
- Keep it relaxed. The rhythm should feel comfortable and unhurried. Imagine you're telling a story. Don't rush the changes or strum too aggressively.
- Practice chord changes with a metronome. Set it to a slow tempo (around 60-70 bpm) and just switch between the chords in time. This will build your muscle memory.
- Let the chords ring. This is an open, atmospheric song. Make sure you aren't accidentally muting strings with your fingers. Every note should sing.
- Focus on dynamic contrast. Play the verses at a medium volume, then build slightly into the line before the solo to create emotional impact.
3. Voicing the Melody: Learning Gilmour's First Lyrical Solo

After the first verse, a second guitar enters with a beautiful, vocal-like solo that mirrors the intro's melody. This is a study in taste and restraint.
- Think like a singer. This solo isn't about speed; it's about melody. Each note should feel like it's part of a sentence. Hum the melody first to internalize it.
- Nail the bends. The soul of this solo comes from David Gilmour's signature string bends. Practice bending up to the target pitch accurately and holding it with a gentle vibrato.
- Learn it phrase by phrase. Just like the intro, break the solo down into small, memorable licks. Learn the first one, loop it, then add the next.
- Pay attention to the space between notes. Gilmour is a master of silence. The pauses and breaths are just as important as the notes themselves. Don't rush to fill every gap.
- Slide into notes for expression. Many of the phrases begin with a slow, deliberate slide into the first note. This adds a layer of vocal-like quality and emotion.
- Use your ears first, tab second. Try to figure out the melody by ear. This will train your musicality. Use a reliable tab to check your work and refine the details.
- Focus on a warm tone. If playing on an electric, use the neck pickup with a clean tone and maybe a touch of compression and reverb to help the notes sustain.
4. The Emotional Peak: Conquering the Main Acoustic Solo

This is the song's centerpiece and its most challenging part on guitar. It’s a fast, intricate, and deeply emotional acoustic solo that requires precision and feel.
- Slow it down. Way down. There is no other way to learn this solo. Use a program or app to slow the recording down to 50% speed without changing the pitch.
- Tablature is your best friend here. This solo is too fast and complex for most people to learn purely by ear. Find a high-rated, accurate tab to use as your guide.
- Break it into four-beat measures. Go through the tab one measure at a time. Do not move on to the next measure until you can play the current one perfectly at a slow tempo.
- Master the double-stops. A key feature of this solo is playing two notes at once, often bending one of them. Isolate these double-stop phrases and practice them on their own.
- Focus on picking-hand accuracy. Your picking hand needs to be incredibly precise to hit the right strings during the fast-paced arpeggios and runs. Practice alternate picking to build speed and control.
- Memorize the patterns. While complex, the solo is built on repeating patterns and licks based around the song's chords. Recognizing these patterns will make it easier to memorize.
- Build speed gradually. Once you can play a section perfectly at 50% speed, bump it up to 60%, then 70%, and so on. Be patient; this is a marathon, not a sprint.
5. Bringing It Home: Structure, Vocals, and Performance Tips
You’ve learned all the pieces. Now it’s time to assemble them into a complete performance that captures the spirit of the original.
- Map out the song structure. Write it down: Intro -> Rhythm Guitar Enters -> Verse 1 -> First Solo -> Verse 2 -> Main Solo -> Outro Verse -> Fading Strums & "Wind" Sounds. Knowing the road map is crucial.
- Practice your vocal timing. If you're singing, pay close attention to where the lyrics fall in relation to the chord changes. The phrasing is relaxed, so feel it out.
- Hum the melody while you play. This is a great trick to internalize the song's timing. If you can hum the vocal and solo melodies while playing the rhythm part, you truly know the song.
- Record yourself. Use your phone to record your playing. Listening back is the best way to hear mistakes in timing, missed notes, or inconsistent rhythm that you might not notice while playing.
- Play with dynamics. The song builds and fades. Start the intro quietly, build volume for the verses, let the solos soar, and bring it all back down for the final verse, ending in a near-whisper.
- Add the "wind" effect. For a final touch, you can mimic the wind/synth sounds at the end by lightly rubbing the palm of your hand up and down the lower, wound strings of your guitar.
- Play it for someone. The final step is to share it. The song is called "Wish You Were Here," after all. Playing it for friends or family is the ultimate way to bring its message to life.
### Conclusion
Learning "Wish You Were Here" is a rewarding journey that teaches you more than chords and solos—it teaches you about phrasing, emotion, and storytelling. Don't be discouraged if it doesn't sound perfect overnight. The most important thing is to connect with the music. Take these pieces, practice them with patience, and then, make the song your own. Infuse it with your own feeling, and you'll be playing a tribute that is both faithful and deeply personal.