Learning to play Pink Floyd's "Wish You Were Here" is a rite of passage for many guitarists. More than just a collection of notes, the song is a universe of emotion packed into a few simple, resonant chords. It speaks of absence, memory, and a deep, soulful longing that connects with listeners on a profound level. Whether you're a beginner just starting your journey or an experienced player revisiting a classic, this guide will help you channel the song's unique atmosphere.
This article breaks down the song into manageable pieces, from the fundamental chords to the iconic riffs and solos. Think of each section as a different way to express the song's core message. So, grab your acoustic guitar, settle in, and let's explore the beautiful, melancholic world of "Wish You Were Here."
The Essential Chords: Your Foundational Palette
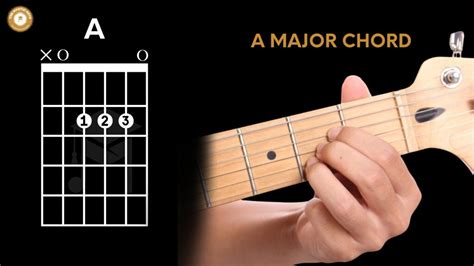
Before you can play the song, you need to know the basic shapes that form its emotional core. These are the primary colors you'll use to paint the full picture. Practice transitioning smoothly between them.
- G Major (G): The cornerstone of the song. Play it full and let it ring out; this is your home base.
- C Major (C): Often used as a variation (C/G), this chord provides a lift and a sense of questioning.
- D Major (D): Another key chord, often played as D/F# to create a beautiful walking bassline. It adds a feeling of resolution.
- A Minor (Am): The heart of the song's melancholy. When this chord hits, you feel the "wishing" part of the title.
- E Minor (Em): Used in the intro riff, this chord adds a touch of darkness and contemplation.
- Pro Tip 1: For a more authentic sound, try playing the C chord as a C/G (332010). This keeps the G note in the bass, creating a smoother transition from the G chord.
- Pro Tip 2: Similarly, play the D as a D/F# (2x0232). This simple change makes the progression from G to Am sound much more deliberate and professional.
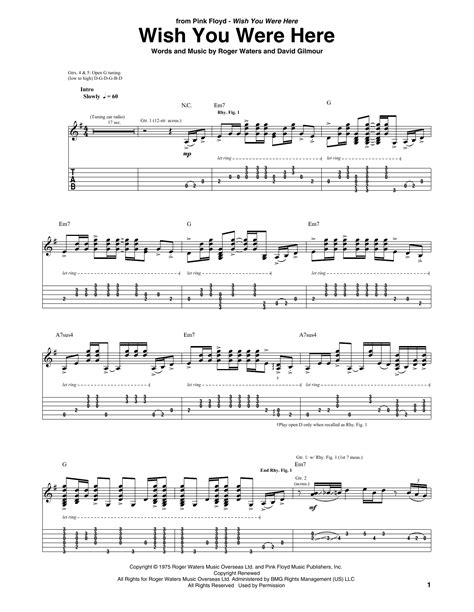
Decoding the Iconic Intro Riff

The opening 12-string riff is one of the most recognizable sounds in rock history. It sounds complex, but it's built around simple hammer-ons within basic chord shapes. Here's how to approach it.
- Start with an Em7 shape: Play the chord (022030) and pluck the A, D, and G strings.
- Add the G: Use your pinky to hammer-on the 3rd fret of the high E string to get that G note (022033).
- The Main Riff (Simplified): The pattern is a slow G-C-G-D progression. Focus on the melody created with hammer-ons on the G and high E strings.
- Listen Closely: The most important tip is to listen to the original recording. The timing is loose and full of feeling. Don't rush it.
- Technique Focus: This section is all about the "hammer-on." Practice striking the string with your fretting finger without picking it again to make the note sound.
- The "Radio" Sound: The intro was famously recorded to sound like it was coming from a tinny AM radio before the full acoustic guitar enters. Imagine that transition as you play.
- Don't Worry About Perfection: Even David Gilmour didn't play it exactly the same way every time. Capture the *feeling* of the riff, not just the notes.
Verse Chords & Strumming Pattern

This is where the story unfolds. The chord progression for the verses is poignant and powerful, and the strumming pattern is the engine that drives it.
- The Progression: The main verse progression is C/G - D/F# - Am - G - D/F# - C/G. Play through this sequence slowly to feel how the mood shifts.
- Strumming Pattern: A great starting pattern is Down, Down, Up, Up, Down, Up. It's versatile and fits the song's rhythm perfectly. Emphasize the first two down strums.
- Verse 1 Message: "So, so you think you can tell..." This section feels like a gentle, almost weary question. Play it with a softer touch.
- Verse 2 Message: "Did they get you to trade your heroes for ghosts?" The intensity builds here. Strum a little harder and put more weight into the Am chord to convey the emotion.
- Dynamic Control: Play the verses quieter than the chorus/solo sections to create contrast and emotional impact.
- Vocal Phrasing: Try humming the vocal melody as you play. It will help you internalize the rhythm and the placement of the chord changes.
- Let It Breathe: Leave space between the chord changes. The silence between the notes is just as important as the notes themselves.
Mastering the Guitar Solos (Rhythm & Feel)

While the lead solos are legendary, the chords played *underneath* them are what provide the soaring, atmospheric backdrop. This is your chance to support the melody.
- The Progression: The rhythm guitar during the solos follows the same progression as the intro: Em7 - G - Em7 - G - Em7 - A7sus4 - Em7 - A7sus4 - G.
- First Solo's Feel: This solo is lyrical and bluesy. Your rhythm playing should be steady and supportive, a solid foundation for the lead to cry over.
- Second Solo's Feel: The outro solo is a farewell. It's filled with release and a sense of fading away. Let your final G chord ring out into silence.
- Improvisation Tip: If you want to try soloing yourself, the G major pentatonic scale (G-A-B-D-E) is the perfect tool. It will work beautifully over these chords.
- Focus on Bending: The signature sound of the solos comes from David Gilmour's incredible string bends. Even when playing rhythm, think about that "stretching" sound to inform your feel.
- Teamwork in Music: This section is a great reminder that playing rhythm is not a secondary role; it's a partnership with the melody.
- The A7sus4 Chord: This chord (x02030) creates a beautiful tension before resolving back to the G. Lean into it.
Putting It All Together: The Full Song Structure

Once you're comfortable with the individual parts, it's time to assemble the masterpiece. Knowing the structure helps you tell the complete story from beginning to end.
- 1. Intro Riff: The "radio" part, followed by the main intro riff.
- 2. Rhythm Guitar Enters: The full-bodied acoustic guitar comes in.
- 3. Verse 1: "So, so you think you can tell..."
- 4. Guitar Solo 1: The first melodic, lyrical solo over the rhythm chords.
- 5. Verse 2: "Did they get you to trade..."
- 6. Outro Solo: The final, fading slide guitar solo.
- 7. Final Riff & Fade Out: The song concludes with the intro riff fading into atmospheric wind sounds.
- Practice in Sections: Don't try to play the whole thing at once. Master the verse, then the solo rhythm, then practice transitioning between them.
- Build Your Stamina: At nearly six minutes long, it's a journey. Work up to playing it all the way through without stopping.
- Create a Backing Track: Record yourself playing the rhythm part, then practice playing the intro riff or improvising a solo over it.
Remember, learning the "Wish You Were Here" chords is about more than technical skill. It's about connecting with a piece of musical history and expressing an emotion that is universal. Don't be afraid to close your eyes, think of who or what you're missing, and pour that feeling into the strings. Personalize it, make it your own, and let the music say what words cannot.