### Keyword Analysis
- Keyword: "chords for pink floyd wish you were here"
- Occasion: This is not a traditional greeting card occasion. The "occasion" is the personal quest of a musician, likely a guitarist, to learn a deeply meaningful and iconic song. It's a moment of learning, artistic expression, and connection with a beloved piece of music.
- Tone: The tone of the song itself is melancholic, nostalgic, reflective, and deeply heartfelt. Therefore, the article's tone should be respectful, encouraging, and appreciative of the song's emotional weight. It should be less like a dry technical manual and more like a wise mentor guiding a student.
- Recipient: The recipient is the aspiring musician searching for this information. They are a fan of Pink Floyd and want not just the "what" (the chords) but the "how" (the feeling, the technique) to do the song justice. They appreciate both clarity and artistry.
### Invented Article Categories
Based on the analysis, here are 5 creative and highly relevant categories that go beyond a simple chord chart to truly help the musician learn the song:
1. The Essential Blueprints: The Core Chord Shapes
2. Decoding the Iconic Intro: The Notes Between the Chords
3. Channeling the Floyd Feel: Capturing the Song's Soul
4. The Second Guitar's Story: Weaving in the 12-String Magic
5. Common Stumbling Blocks & How to Play with Grace
### Your Ultimate Guide: Unlocking the Chords for Pink Floyd's 'Wish You Were Here'
Learning to play "Wish You Were Here" is a rite of passage for almost every guitarist. It’s more than just a song; it’s a mood, a memory, a feeling of poignant longing captured in a few simple, perfect chords. From the crackle of the radio intro to that last, fading strum, the song invites you in and asks you to share in its beautiful melancholy. It’s the quintessential campfire song, the one that quiets a room, and the one that connects players and listeners in a shared moment of reflection.
But to play it right is to do more than just follow a chord chart. It's about capturing the space, the dynamics, and the raw emotion that David Gilmour and Roger Waters poured into the original recording. This guide is for you, the musician who doesn't just want to play the notes, but wants to understand the soul of the song. Here’s how you can learn the chords and techniques to play "Wish You Were Here" with the heart it deserves.
The Essential Blueprints: The Core Chord Shapes
This is your foundation. The entire song is built on a handful of open chords that are staples for any acoustic player. Get comfortable with these clean, ringing shapes first.
- G Major (G): The song's home base. Let it ring out full and hopeful.
- E Minor (Em): The touch of melancholy. Often written as Em7 in more detailed tabs, which adds a lovely open G string.
- C Major (C): The lift in the verse, a moment of clarity.
- D Major (D): The counterpart to C, creating the classic C-D-G progression that feels so resolved.
- A Minor (Am): The shadow in the verse, adding a deeper sense of yearning.
- The Main Verse Progression: The heart of the song is the gentle back-and-forth: C/G - D/F# - Am - G.
- The "So you think you can tell" part: This is where the C and D chords truly shine, leading you back home to G.
- Practice Tip: Work on switching between C, D, Am, and G smoothly. The cleaner your transitions, the more professional the song will sound.
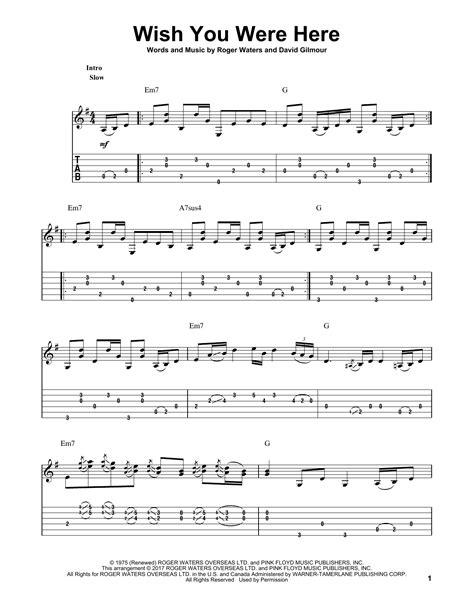
Decoding the Iconic Intro: The Notes Between the Chords

The famous intro isn't just strumming; it's a delicate riff that sets the entire mood. This is where you add the professional touch.
- It’s all about the hammer-ons: The riff is built on hammering-on to the main chord shapes.
- The First Phrase (Em7): Start with an Em7 shape and use your index finger to hammer-on to the A string (2nd fret) and your middle finger to hammer-on to the D string (2nd fret).
- The Second Phrase (G): Switch to a G chord and repeat a similar hammer-on pattern on the A and D strings.
- The A7sus4 flourish: That beautiful, unresolved sound before the main riff repeats is an A7sus4. It’s easier than it sounds—just hold down the D and B strings at the 2nd fret.
- Listen, then play: The best way to learn this is to listen to the original recording over and over. Hum the riff. Internalize its rhythm before you even try to play it.
- Don't rush it: The magic of the intro is its lazy, unhurried pace. Let each note and chord breathe.
- Think of it as a melody: Don't just see this as a series of chords. You are playing a melodic line on top of the chord shapes.
Channeling the Floyd Feel: Capturing the Song's Soul

Anyone can play the chords. A true fan plays the *feeling*. This is how you infuse your playing with the song’s signature atmosphere.
- Play with dynamics: The verses are soft and conversational. The solo section builds slightly. Don't play at one volume.
- Embrace the space: The silence between the notes is just as important as the notes themselves. Don't be afraid to pause for an extra beat.
- Use a "loose" strumming hand: Avoid a rigid, aggressive strum. Your wrist should be relaxed. Think of it as gently brushing the strings rather than hitting them.
- Let the bass notes lead: When you switch chords in the verse (like from C to D), emphasize the bass note of the new chord to guide the listener's ear.
- The vocal-style solo: When you get to the acoustic solo, try to make your guitar "sing" the melody. Use slides and slight bends to mimic the expressiveness of a human voice.
- Play it like you're telling a secret: This song is intimate. Imagine you're sharing a personal story with just one other person in the room.
- It's okay if it's not perfect: A slight buzz or a muted string can sometimes add to the raw, authentic feel of the song. Don't chase sterile perfection.
The Second Guitar's Story: Weaving in the 12-String Magic

On the original recording, there are two main acoustic guitars. The second one, a 12-string, adds a shimmering high-end texture.
- Listen for the sparkle: Re-listen to the track and focus only on the higher-pitched guitar. You'll hear it playing simple, beautiful licks over the main chords.
- Play with a friend: This song is a perfect duet. One person can hold down the main rhythm and intro riff while the other plays the melodic fills.
- Simple melodic ideas: The second guitar often just plays arpeggios (the notes of the chord played one by one) or simple, country-inspired licks around the main chord shapes.
- The key of G is your friend: All the little fills and licks are based in the G major scale. You can experiment with this scale over the chord progression to create your own fills.
- Try a capo: If you're playing alone, you can mimic the brightness of the second guitar by placing a capo on the 3rd or 5th fret and playing the same chord shapes.
- It’s about texture, not complexity: The second guitar part is not difficult, but it's essential for creating the rich, layered sound of the studio version.
Common Stumbling Blocks & How to Play with Grace

Every guitarist hits a few bumps when learning this song. Here are some common ones and how to smooth them out.
- Sloppy hammer-ons: If your hammer-ons sound weak or muted, make sure your finger is landing decisively, right behind the fret. Practice the motion slowly and deliberately.
- Rushing the tempo: The song feels slower than you think. Play along with the original recording or a metronome set to a relaxed pace (around 60-65 BPM).
- Strumming too hard: This song requires a gentle touch. If it sounds harsh, you're probably attacking the strings too aggressively. Ease up.
- Awkward C to D/F# transition: That D/F# chord can be tricky. Use your thumb to fret the low F# note on the E string, which allows your other fingers to form the rest of the D chord more easily.
- Losing the rhythm during the solo: The acoustic solo is rhythmically free, but it still fits over the underlying chord progression. Keep your foot tapping the basic beat even as you play the more expressive melody.
- Uninspired chord changes: Make your chord changes part of the music. Let the last strum of one chord lead you directly into the first strum of the next, creating a seamless flow.
### Make It Your Own
"Wish You Were Here" is a timeless song because it speaks to a universal human emotion. Once you have the chords and the techniques down, the final and most important step is to connect with it yourself. Think about what it means to you. Play it with intention, infuse it with your own feelings, and let your guitar tell the story. The best tribute you can pay to this masterpiece is to not just play it, but to truly feel it.