Here is the high-quality, comprehensive listicle article on the topic: "strumming pattern for wish you were here".
"Wish You Were Here" by Pink Floyd is more than just a song; it's a mood, a memory, a timeless piece of musical history. For any guitarist, learning to play it feels like a rite of passage. That iconic acoustic opening, the heartfelt lyrics, and the deceptively simple chord progression create an experience that resonates deeply. But capturing its signature sound is all in the rhythm and feel.
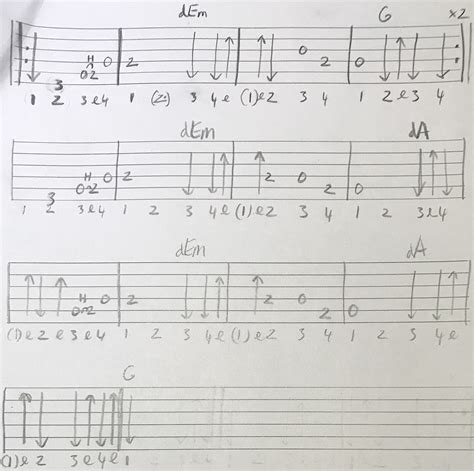
If you've been searching for the definitive "strumming pattern for Wish You Were Here," you've come to the right place. This guide will break down not just the core strumming, but also the iconic intro riff, the subtle fills, and the pro tips you need to play this masterpiece with the soul it deserves. Let's tune up and dive in.
Breaking Down the Iconic Intro Riff (It's Not Just Strumming!)

The first thing to know is that the famous 12-string intro isn't a strummed pattern at all. It's a delicate, arpeggiated riff that sets the song's melancholic tone. Here’s how to approach it.
1. Listen, then Learn. Before your fingers even touch the fretboard, listen to the intro on repeat. Notice how the notes are distinct and clear. It’s a sequence of single notes and hammer-ons, not a wash of chords.
2. Master the Hammer-On. The key technique here is the hammer-on. Practice forming a G chord and picking the open G string, then hammering on to the second fret (the A note) without picking the string again.
3. Follow the Lick. The intro lick is a combination of open strings and hammered-on notes primarily within a G chord shape. Think of it as: G-string (open -> hammer-on 2nd fret), D-string (open), G-string (open), D-string (open -> hammer-on 2nd fret), G-string (open).
4. It's All in the Timing. The rhythm is syncopated and relaxed. Don't rush it. Feel the space between the notes. This is what gives the intro its thoughtful, spacious quality.
5. Use a Metronome (Slowly). Start practicing the riff at a very slow tempo, like 60 BPM. Focus on clean notes and perfect timing before you gradually increase the speed.
6. The Second Guitar. Remember, on the recording, a second acoustic guitar (a six-string) enters with a simple, almost careless-sounding strum. This is what many people mistake for the main pattern.
7. Transition to the Chords. The intro riff seamlessly leads into the main G chord that kicks off the verse. Practice transitioning from the final note of the riff directly into the first strum of the verse.
The Core Verse Strum: Your Bread-and-Butter Pattern

This is it—the heartbeat of the song. Once the vocals come in, the strumming becomes more defined. The primary pattern is consistent, using a mix of bass notes and full strums to create momentum.
1. The Go-To Pattern. The most common and effective strumming pattern for the verses is: Bass Note - Down, Down, Up, Up, Down, Up.
2. Applying the Pattern. For the G chord, you'd pick the low G bass note on the 6th string, then strum the full chord: (G-bass) - D, D, U, U, D, U. For the C chord, you'd pick the C bass note on the 5th string first.
3. Count it Out. To get the rhythm, count it as: 1 and 2 and 3 and 4 and. The bass note lands on beat 1. The first down-strum is on the "and" of 1.
4. Keep Your Wrist Loose. The key to a natural-sounding strum is a relaxed wrist. Avoid a stiff, robotic arm motion. Let the movement flow from your wrist and forearm.
5. Emphasize the Bass Note. Give that first, single bass note a little extra emphasis. This separates the chords and creates the song's signature rhythmic walk.
6. Practice on a Single Chord. Before trying to play the whole song, just hold a G chord and repeat the core pattern over and over. Get it into your muscle memory until it feels completely natural.
7. Dynamics are Everything. Don't play every strum at the same volume. Play the verses softly and build volume slightly as you approach the solo sections to create emotional impact.
Adding That "Floyd" Magic: Feel, Fills, and Dynamics

Playing the right notes and strums is one thing; playing with *feel* is another. Pink Floyd's music is full of nuance, and adding these small details will elevate your performance.
1. The "Lazy" Up-Strum. On some of the up-strums, don't worry about hitting all six strings. A light flick that only catches the top two or three (G, B, E) strings can add a delicate, authentic texture.
2. Incorporate "Ghost Strums." A ghost strum is a motion where your hand strums the air without touching the strings, helping you keep time. It makes your rhythm more fluid and less mechanical.
3. Let it Breathe. The spaces between the vocal lines are just as important as the lines themselves. Hold the chords and let them ring out. Don't feel the need to fill every single second with noise.
4. Vary Your Intensity. Strum a little harder and more deliberately during the guitar solo sections to support the lead melody. Then, bring it back down when the next verse begins.
5. Add a Suspended Chord. When transitioning from C to D, briefly play a Dsus4 (by adding your pinky to the 3rd fret of the high E string) before resolving to the D major. It's a classic rock move that adds melodic interest.
6. Listen for the Little Things. On the recording, you can hear string squeaks, slight hesitations, and other "imperfections." Don't be afraid to let these happen in your own playing; they add character.
7. Play with Passion. This is a song about absence and longing. Connect with that emotion. Close your eyes and let your feelings guide your hands. Your playing will be a thousand times more compelling.
Navigating the Chord Changes & Bass Runs

One of the most beautiful parts of the song is the melodic movement between the chords, especially the bass note walkdowns. Mastering these makes your playing sound truly professional.
1. The G -> Em Walkdown. The transition from G to Em in the solo section isn't just a chord change; it's a walkdown on the low E string: G (3rd fret), F# (2nd fret), E (open). Practice picking just those notes to connect the chords.
2. Anticipate the Change. The secret to smooth chord transitions is to start moving your fingers *before* the next beat. As you complete the last strum of a G chord, your fingers should already be heading towards the C shape.
3. The C -> D -> Am -> G Progression. This is the core of the verse. Practice this specific sequence relentlessly. Your fingers need to know exactly where to go without you having to look.
4. Anchor Fingers. When changing from G to C, try to keep your first finger (on the B string, 1st fret) as a pivot or "anchor" point if possible, to make the movement smaller and faster.
5. Focus on the Bass Note First. When changing chords, your first priority is to land the correct bass note on beat 1. The rest of the strum can follow. This will keep your rhythm solid even if the chord shape is a little clumsy at first.
6. The Am -> G Change. The change from Am back to G can be tricky. Focus on lifting all fingers cleanly and placing them for the G chord. Speed will come with repetition.
7. Isolate the Tricky Parts. If you keep stumbling on the C to D change, don't play the whole song. Just practice that one transition over and over for five minutes straight.
Tips for a Killer Performance: From Practice to Polish

You've got the parts down. Now, how do you put it all together to create a performance that captivates?
1. Know the Song Structure by Heart. Map it out: Intro, Verse 1, Solo 1, Verse 2, Solo 2, Outro. Knowing what comes next allows you to play with confidence and focus on the feel.
2. Record Yourself. Use your phone to record your playing. Listening back is the single best way to identify areas where your timing is off or your strums are uneven.
3. Try a 12-String (If You Can). If you have access to a 12-string acoustic guitar, try playing the song on it. It will instantly give you that shimmery, chorus-like effect from the record.
4. Play Along with the Original. Once you're comfortable, try playing along with Pink Floyd's recording. This is the ultimate test of your timing and feel. Try to blend in as if you were the second guitarist in the studio.
5. Don't Be Afraid to Simplify. If the bass note-strum pattern is too much at first, just use a simple Down, Down, Up, Up, Down, Up pattern. You can always add the bass notes later.
6. The Outro Fade. The song ends with a beautiful, windy fade-out over a repeating G chord. Replicate this by gradually strumming softer and softer until your playing dissolves into silence.
7. Sing Along, Even Quietly. Even if you're not a singer, humming the melody or whispering the words as you play will connect your strumming hand to the song's phrasing and emotion.
### A Final Note
Learning "Wish You Were Here" is a journey, not a race. Each time you pick up your guitar to play it, you’ll discover something new. Take these patterns and tips as your foundation, but don't be afraid to make the song your own. The most important thing is to play it from the heart, infusing your own feelings of longing, memory, and hope into those timeless chords. Now go make some magic.